shadcn/studio IDE Extension
AI-PoweredInstall Shadcn Studio IDE Extension in your favorite IDE. Visual UI editor, integrate shadcn/studio blocks & themes without leaving your IDE or browser. Build your UI 10x with shadcn/studio IDE Extension.
Overview
The Shadcn Studio IDE Extension brings the power of shadcn/studio directly into your development environment, helps you to build beautiful UIs faster than ever before. Whether you're using Cursor, VSCode, Windsurf, antigravity or any CLI based coding agents, our extension provides seamless access to pre-built components, blocks, and themes.
Designed with modern development workflows in mind, the extension integrates deeply with AI coding agents, allowing you to leverage visual editing, blocks & themes browsing, without context switching. Simply mention @blocks or @themes in your chat, and let the AI assist you in integrating the perfect blocks & themes for your project.
What makes it special?
- Works with all major IDEs and AI coding agents
- Visual editor for real-time visual editing
- One-click installation of blocks and themes
- AI-powered integration with natural language prompts
Free vs Pro
The shadcn/studio IDE Extension is available on both Free and Pro plans - all core features like search/preview blocks & themes, installation, visual editor integration and toolbar features work the same for both free and pro users.
Free Plan
- Use all IDE Extension and Toolbar features
- Access to free blocks & themes only
- No access to premium blocks & themes
Pro Plan
- Everything in Free
- Access to all premium blocks & themes
- New premium content as soon as it is released
Key Features
shadcn/studio Toolbar
Visual Editor
Use the visual editor to edit code visually. Select elements and pass prompts. Example: make the button color Red.
shadcn/studio Blocks & Themes
Explore and integrate shadcn/studio blocks & themes directly from the toolbar. Triggers with '@blocks' & '@themes' in the chat panel.
Documentation
Provide documentation reference to your IDE agent. Triggers with '@docs' in chat panel.
shadcn/studio IDE Extension
Search / Preview Blocks
Easily search and explore shadcn/studio blocks. Preview blocks in browser using the preview button.
Copy CLI Installation Command
Copy the installation command for selected shadcn/studio block. Paste directly in terminal.
Install Block
Install a block directly into your project by sending the CLI command to terminal with one click.
Apply Theme
Browse and apply shadcn/studio themes to your project in just one click.
Usage of Shadcn Studio IDE Extension
Visual UI Editor
Use the visual editor to edit the code visually. Select elements you want to update and pass prompts.
Blocks & Themes Integration
Easily access and integrate shadcn/studio blocks & themes in your project directly from the toolbar.
Documentation Reference
Provide documentation reference to your IDE agent with Context7 MCP server for better guidance.
Installation Guide
Follow this step by step guide to install and set up the Shadcn Studio IDE Extension.
Step 1: Install IDE Extension
Choose any one of the following methods to install the Shadcn Studio IDE Extension:
- Go to extensions Menu in your IDE.
- Search for "Shadcn Studio IDE Extension" in search bar.
- Install the Shadcn Studio IDE Extension by clicking on "Install" button.
Click on the card for your IDE to install instantly:
- Visit link based on your IDE
- Shadcn Studio IDE Extension for VS Code
- Cursor/Windsurf/Trae: Shadcn Studio VS Code Extension
- Click the download button to download the VSIX file in your system.
- Open your IDE. Press
Ctrl + Shift + PorCmd + Shift + Pand search for "Install extension from VSIX". - Select the downloaded file and it will install the Extension in your IDE.
Step 2: Install Shadcn Studio Extension CLI
Open Your Project in which you want to use Shadcn Studio IDE Extension. Please make sure that you have setup shadcn CLI in the project. If you haven't, please refer here: How to use Shadcn CLI
Please note that Shadcn CLI v2 (Legacy) has been deprecated and is no longer supported. To continue installing components, blocks, and themes from shadcn/studio, please upgrade to CLI v4. For more info, please refer here: How to use Shadcn CLI.
Open the terminal and enter the below command:
This will ask for the port number on which the dev server of your project is running. After this, your project will open on port 3200. Now, you can see the toolbar with Shadcn Studio Logo in your right bottom corner when you run the dev server of your project. That's all!
Now that you have installed the extension and setup CLI, let's explore the two main components of the shadcn/studio IDE Extension:
- 1. shadcn/studio IDE Extension.
- 2. shadcn/studio Toolbar (You will see this in a browser)
Let's explore them one by one.
Explore shadcn/studio IDE Extension
If you have successfully installed the shadcn/studio IDE Extension, you can access it from the activity bar in your IDE. Click on the shadcn/studio icon to open the extension panel.
1. Setup the shadcn/studio IDE Extension
Before you start using the shadcn/studio IDE Extension, add your shadcn/studio Pro license key and email in the extension settings (if you have a Pro license). You can open the settings from the top of the extension panel by toggling the settings menu.
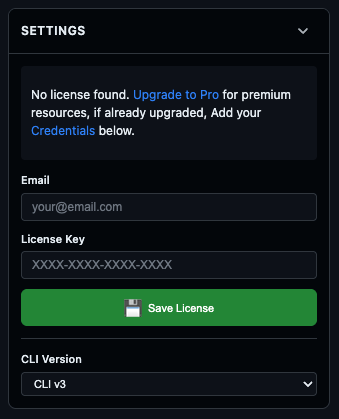
- If you've already purchased shadcn/studio Pro, simply add your license key & email to unlock the Pro blocks by toggling the settings menu.
- If you'd like to upgrade, click the link to visit the shadcn/studio website and upgrade to PRO plan.
- If you prefer not to upgrade right now, keep it blank and you can continue using all the free shadcn/studio blocks.
2. Search shadcn/studio Blocks
You can easily search shadcn/studio block by using the search bar.
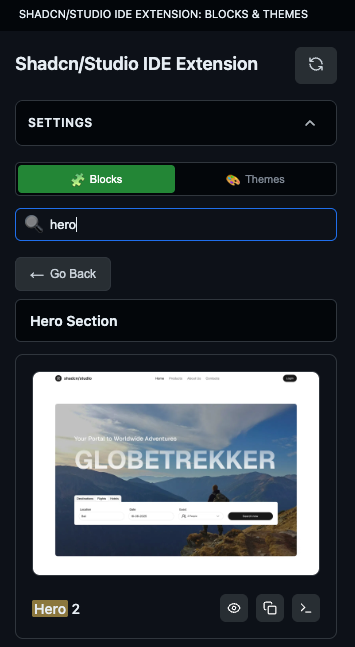
For each block, you have three buttons on the bottom of each block's card:
Preview:
Opens the preview of the section in the browser for better view.
Copy CLI command:
Copies the CLI installation command to your clipboard.
Install Block:
Sends your installation command directly to terminal and installs the block in your project.
3. Search & Apply Themes to Your Project
You can switch to the Themes section using the tab below the settings menu.
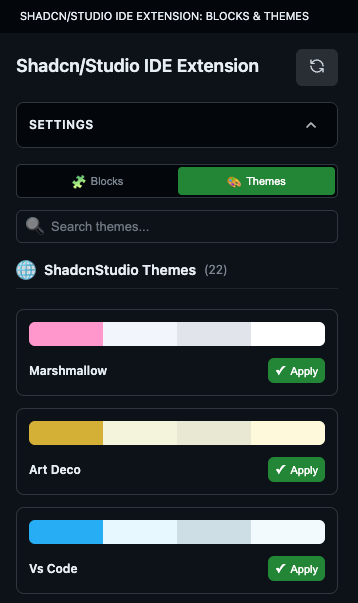
You can search shadcn/studio themes and easily apply the theme in your project by using the Apply button in each theme card.
If you have added your credentials in the settings menu, you can also access the custom theme that you have created in your shadcn/studio account.
Explore shadcn/studio Toolbar
You’ll find the shadcn/studio toolbar in your browser when the app is running on port 3200. Look for the shadcn/studio logo in the bottom-right corner. Click the logo to open the toolbar menu, where you'll see two options: Settings Menu and Chat Panel.
Settings Menu
You can configure the settings for toolbar from the settings interface.
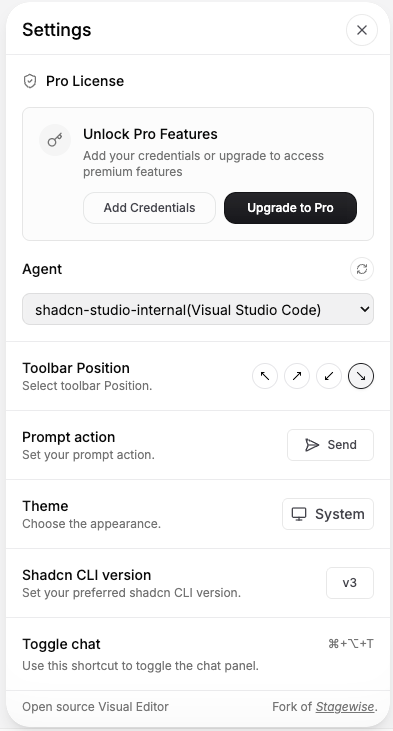
1. Manage Your Credentials
- If you've already purchased license of shadcn/studio, click the Add Credentials button and enter email & your license key.
- If you'd like to upgrade to Shadcn Studio Pro, click the Upgrade to Pro button. You'll be redirected to the shadcn/studio website for purchase.
- If you haven't purchased shadcn/studio Pro and don't plan to right now, you can continue using the free version.
2. Agent
Here you will see the Dropdown menu. You need to select the Project with IDE Agent. Use the refresh button if you can't see your project.
3. Toolbar Position
You can toggle the position of the toolbar from here.
4. Prompt Action
This has three options:
- Send - Send the Prompt and other info to your selected IDE Agent
- Copy - Copy the Generated prompt with the details you have provided. Useful for CLI Agents like Claude Code, Gemini CLI, Roo code or Cline
- Both - Sends the Prompt to IDE agent and also copies it to the clipboard
5. Theme
You can select the Theme from here: Light / Dark / System.
6. Toggle Chat
Use the Shortcut to toggle the Chat Panel.
Chat Panel
Explore Chat Panel features:
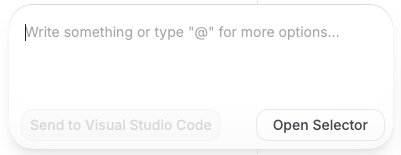
1. Open Selector
Click on the Open Selector. Now, you can select the UI elements and pass it with a prompt to your IDE Agent to make changes to your UI.
2. Send to IDE
You can send any prompt to IDE Agent by using this button.
3. Options
We have various options when you type @. This will open menu where you have three options:
- Documentation
- shadcn/studio Blocks
- shadcn/studio Themes
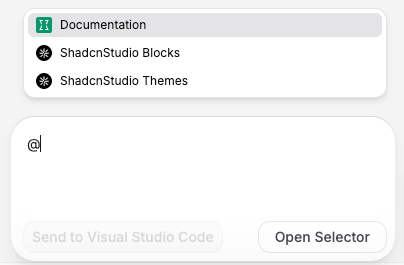
Documentation
You can attach the Documentation of the framework / library you are using in your project. This will provide reference to your IDE agent for the documentation of framework / library.
shadcn/studio Blocks
You can directly access the shadcn/studio Blocks from the Chat Panel and directly integrate them into your project from here.
Once you select the shadcn/studio Blocks, you need to search the block that you want to integrate in your project. You can also preview the block you want to select.
Once you select the shadcn/studio Block, you can pass the custom prompt to customize the block as per your requirement and then send it to your IDE agent.
Please make sure that you use the AI model Claude Sonnet 4 or higher, for best results.
shadcn/studio Themes
Browse and apply shadcn/studio themes to your project directly from the chat panel.