A Figma MCP server is transforming how designers and developers connect design with AI. By linking Figma to AI systems through the Model Context Protocol (MCP), teams can securely give AI structured access to real design files instead of relying on screenshots or manual descriptions.
In this blog, we’ll break down what a Figma MCP server is, how it works, why it matters, and how you can set one up & how Figma Make works. Whether you’re looking to automate design-to-code workflows, extract design tokens, or build smarter AI-powered tools around your design system, this guide will help you understand the complete picture.
Table of Contents
What is the MCP Server?
MCP full Form is Module Concept Protocol, MCP stands for Read Real Time information like layout, structure, spacing, and components, so this helps to get more accurate results.
Instead of copying data manually, MCP allows:
- Controlled access to files
- Reading design components
- Pulling structured data
- Triggering actions (depending on permissions)
What Is Figma MCP?
Figma MCP is a core Figma platform capability that allows AI to understand Figma designs. Before, MCP AI tools mostly worked by analysing screenshots. And they tried to guess spacing, hierarchy, colors, and layout rules based on pixels. So, Figma. Solve this problem using Figma MCP and the FigmaMake.
With Figma connected via MCP, AI can:
- Read frames and components from your Figma file
- Extract design tokens
- Generate React / HTML / Tailwind code from designs
- Audit accessibility issues
- Suggest UI improvements
- Create documentation from design systems
Why It Matters?
For designers and developers, this enables:
- Design-to-code automation
- Smarter AI assistants that understand your actual UI
- Faster handoff between design and engineering
- Context-aware UI generation
Instead of describing your design in text, AI can directly “see” your Figma file (with permission).
What is the Role Of MCP Server in Figma?
Figma MCP Server is the most useful Thing in this AI Wave. MCP Server in Figma helps to make Design Using Correct Information about Design it means Figma MCP Read All Design Layout, Structure Component make Tool Like Figma to create a perfect design instead of guessing.
AI has entered design and product building, but for a long time, it struggled with one core problem:
It could see designs, but it could not truly understand them.
That gap between visual appearance and design intent is exactly what Figma MCP is built to solve, and Figma Make is where most people experience its power for the first time.
This article explains Figma MCP and Figma Make in simple language, with real-world context and examples, so that anyone—designer, founder, PM, or developer—can understand and use it confidently.
What the MCP Server Actually Does
Connects AI to Figma:
- The MCP server:
- Authenticates with Figma (via API/token)
- Exposes selected Figma files or projects
- Makes them accessible to AI tools in a controlled format
- Without the MCP server, AI cannot directly access your Figma data.
Translates Design Data into Structured Context:
- Figma files contain:
- Frames
- Components
- Auto-layout rules
- Design tokens
- Styles
- The MCP server:
- Fetches this data via Figma’s API
- Converts it into structured JSON
- Sends it to the AI in a way it can understand
- So instead of raw design data, the AI receives clean, contextual design information.
Enforces Permissions & Security:
- The MCP server controls:
- Which files can AI access
- Whether access is read-only or editable
- What actions are allowed (view, comment, generate, modify)
- This prevents AI tools from having unrestricted access.
Architecture (Simple View)
Figma → MCP Server → AI Model- Figma = source of truth
- MCP Server = secure translator + gatekeeper
- AI Model = reasoning + generation engine
How To Set Up Figma MCP?
Here’s a practical, step-by-step guide to setting up a Figma MCP server so an AI tool can securely access your Figma files.
This connects:
- Figma → Model Context Protocol (MCP Server) → AI tool
Step 1: Create a Figma Personal Access Token
- Open Figma
- Go to Settings → Security
- Generate a Personal Access Token
- Copy it (you won’t see it again)
You’ll use this token to let the MCP server read your files via Figma’s API.
Step 2: Choose or Create an MCP Server
You have two options:
Option A: Use an Existing Figma MCP Server (Easiest):
Many open-source repos provide ready-made MCP servers that:
- Connect to Figma API
- Expose files via MCP
- Handle authentication
Search GitHub for:
figma mcp serverLook for projects that:
- Support read-only access
- Use Figma REST API
- Output structured JSON
Option B: Build Your Own (Node.js Example):
- Install dependencies
npm init -y
npm install express axios dotenv- Create
.envfile
FIGMA_TOKEN=your_figma_personal_access_token- Basic MCP Server Example
import express from "express";
import axios from "axios";
import dotenv from "dotenv";

dotenv.config();
const app = express();
const PORT = 3000;

app.get("/file/:fileKey", async (req, res) => {
  try {
    const response = await axios.get(
      `https://api.figma.com/v1/files/${req.params.fileKey}`,
      {
        headers: {
          "X-Figma-Token": process.env.FIGMA_TOKEN
        }
      }
    );

    res.json(response.data);
  } catch (error) {
    res.status(500).json({ error: "Failed to fetch Figma file" });
  }
});

app.listen(PORT, () => {
  console.log(`MCP Server running on http://localhost:${PORT}`);
});
This:
- Fetches Figma file data
- Exposes it via HTTP
- Makes it available for AI tools to consume
Step 3: Add MCP Protocol Layer
If your AI tool supports MCP directly, your server needs to:
- Implement MCP tool endpoints
- Define available resources (files, components)
- Structure responses as MCP context objects
Most MCP libraries provide:
registerTool()registerResource()- Context formatting utilities
Step 4: Connect the AI Tool to MCP Server
In your AI tool:
- Add a new MCP server
- Provide server URL (e.g.,
http://localhost:3000) - Grant permissions
- Test by asking:
“List components from file XYZ”
If connected properly, the AI should now read structured Figma data.
Step 5: Security Best Practices
- Never expose your Figma token publicly
- Use environment variables
- Use read-only scopes
- Add authentication if deploying publicly
- Restrict file access
Now, let’s check the real-world example by Figma itself: Figma Make
What is Figma Make?
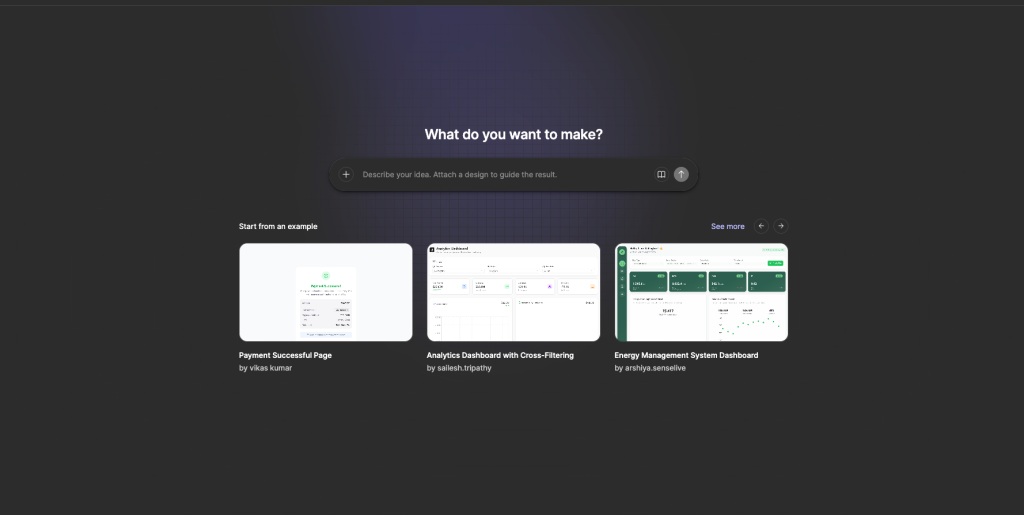
Figma Make is Figma’s AI-powered feature. With the help of Figma Make, you can generate UI and product flows by attaching a real Figma file and describing what you want to build.
Instead of starting from a blank prompt, Figma Make starts from your design.
That design is interpreted through Figma MCP. Figma Make is not just “AI that draws screens.” It is AI that builds based on real design input.
The relationship between the two is simple but powerful:
- Figma MCP is the intelligence layer
- Figma Make is the experience layer
MCP understands the design. Make uses that understanding to generate output. Without MCP, Figma Make would be guessing. With MCP, it works from intent, structure, and rules.
Example:
In This Example, we explore Figma Make’s Easiest and Useful Feature: the Frame Copy-Paste Feature

In this image, we are Taking One Reference Design File as Our Fully Structured and Well Design, Design system’s Block Shadcn Studio’s Hero Block
Step-1: Select Your Reference Frame and Copy
Step-2: Now Open Figma Make
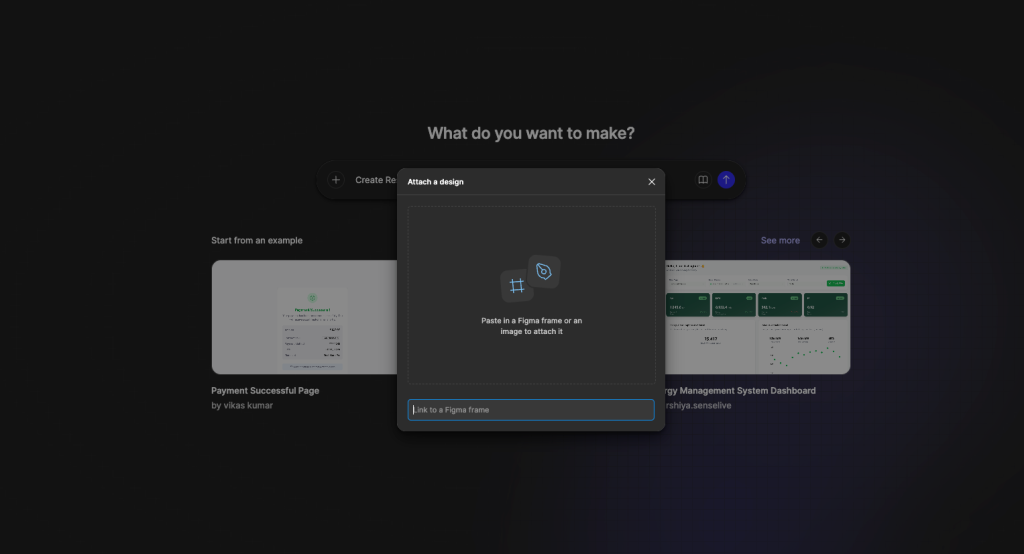
Step-3: Click on the Plus Icon and select the Attach file Option
Step-4: Now Past You Reference Design File And Write Your Prompt
Step-5: Click on the Submit Button.
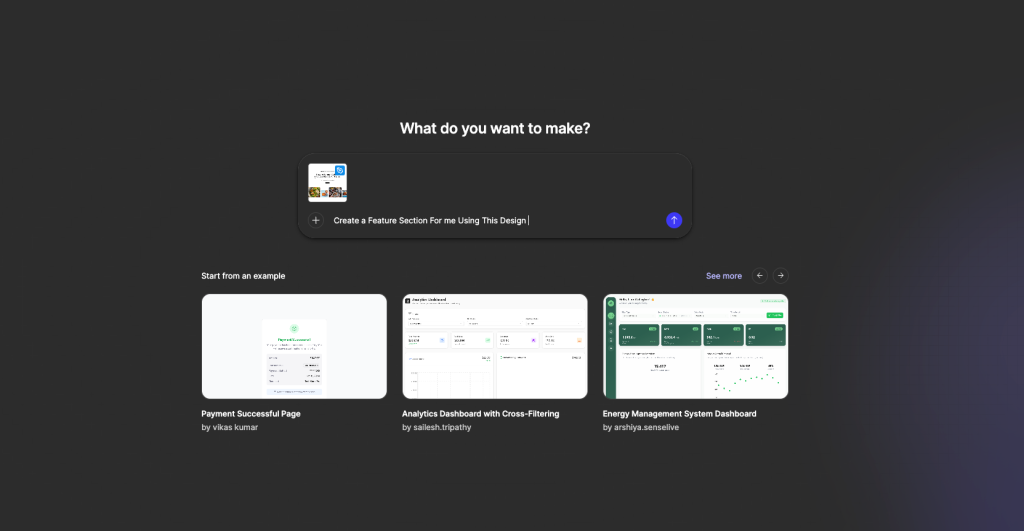
In This Proccess i Copy My Shadcn Studio’s Hero Block Design File and pasted it in figma make and write a prompt on what I want to do.
Result :
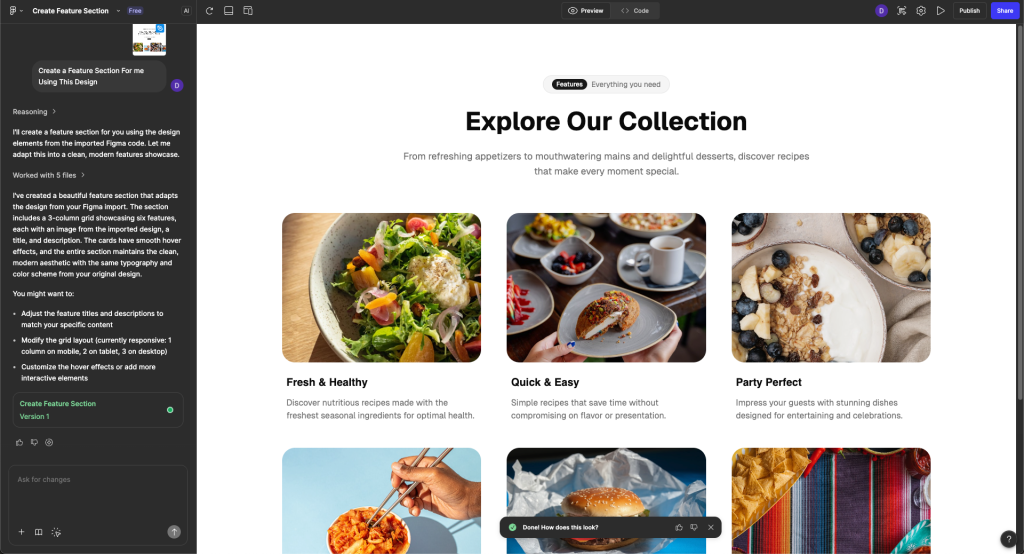
The output generated by Figma Make is clean, well-structured, and closely follows the original design, with proper spacing, consistent styling, and clear layout details.
When you use Figma Make, the result isn’t just a design preview on the screen. It actually gives you real, usable code for the section it generates.
In our case, the design we attached was based on a Shadcn Component system and created using Shadcn Studio. Because the design is already clean and well-structured, Figma Make understands it better and generates code that follows the same Shadcn patterns. This makes the output easier to read, easier to modify, and easier to reuse in a real project.
What really stands out is how flexible the whole process feels. You’re not stuck with whatever the AI gives you on the first try. You can change the text, adjust colors, tweak spacing, or even reshape the layout just by asking. And if you prefer hands-on control, you can always jump into the code and edit things manually.
This is especially helpful if you’re not a designer. You can start with a solid design reference from Shadcn Studio, let Figma Make handle the structure and styling, and then slowly adjust things until it matches your taste or product needs, either through simple prompts or small code changes.
In a very practical sense, Figma Make helps you move from a good design reference to something you can actually use and ship, without feeling overwhelmed by design decisions.
Special Mention: shadcn/studio:

This isn’t a traditional component library or a replacement for Shadcn. Instead, it’s a unique collection that offers customizable variants of components, blocks, and templates. Preview, customize, and copy-paste them into your apps with ease.
Building on the solid foundation of the Shadcn components & blocks, we’ve enhanced it with custom-designed components & blocks to give you a head start. This allows you to craft, customize, and ship your projects faster and more efficiently.
Features:
- Open-source: Dive into a growing, community-driven collection of copy-and-paste shadcn components, Shadcn blocks, and templates.
- Component & Blocks variants: Access a diverse collection of customizable shadcn blocks and component variants to quickly build and style your UI with ease.
- Animated variants with Motion: Add smooth, modern animations to your components, enhancing user experiences with minimal effort.
- Landing pages & Dashboards: Explore 20+ premium & free Shadcn templates for dashboards, landing pages & more. Fully customizable & easy to use.
- shadcn/ui for Figma: Speed up your workflow with Shadcn Figma UI Kit, which consist components, blocks & templates – a full design library inspired by shadcn/ui.
- Powerful theme generator: Customize your UI instantly with Shadcn Theme Generator. Preview changes in real time and create consistent, on-brand designs faster.
- shadcn/studio MCP: Integrate shadcn MCP Server directly into your favorite IDE and craft stunning shadcn/ui Components, Blocks, and Pages inspired by shadcn/studio.
- Shadcn Figma To Code Plugin: Convert your Figma designs into production-ready code instantly with the Shadcn Figma Plugin.
Key Features of Figma Make
One of the best things about Figma Make is how flexible it is when it comes to giving AI the right reference. You’re not limited to one way of working — you can start from designs, libraries, links, images, or even ready-made examples.
Here are the key ways we used Figma Make and how each one helps.
1. Attach a Figma design file
You can directly attach a Figma design file to Figma Make. This allows the AI to read the actual structure of your design instead of guessing.
When you attach a file, Figma Make understands:
- Layout and sections
- Components and patterns
- Spacing, colors, and typography
This works best when your design file is clean and well-organized.
2. Paste a Figma design file URL
If you don’t want to manually upload a file, you can simply paste the Figma file or frame URL.
This makes it easy to:
- Use designs shared by your team
- Reference existing product designs
- Quickly switch between different design versions
Figma Make reads the design directly from the link and uses it as context for generation.
3. Attach a design library
Figma Make also lets you attach a design library as a reference. This is especially useful when you want consistent output across multiple screens.
By attaching a library, the AI can follow:
- Common components
- Reusable styles
- Shared design rules
This helps maintain consistency and avoids random or mismatched UI elements.
4. Upload images as a reference
In addition to Figma files, you can upload images as visual references. This is useful when:
- You have inspiration screenshots
- You want to recreate a section you like
- You don’t have a full design file yet
While images don’t provide as much structure as a Figma file, they still help guide the AI visually.
5. Use Figma’s built-in examples
Figma Make also provides ready-made examples that you can use as a starting point.
These examples help you:
- Understand how Figma Make works
- See how prompts affect output
- Learn by modifying existing references instead of starting from scratch
You can treat these examples as learning templates and gradually adapt them to your own needs.
The future of product building isn’t about AI replacing people—it’s about AI understanding context.
With tools like Figma MCP and Figma Make, AI no longer guesses how a product should look. It understands design structure, layout, and style, which reduces back-and-forth and speeds up execution.
This is especially valuable for small teams and founders. Starting from a real design reference instead of a blank screen makes it easier to move fast, experiment, and iterate with confidence.
In the long run, this brings design and development closer together and helps teams focus more on decisions and creativity, rather than rework.
Final Takeaway
Figma MCP changes how AI works with design by helping it understand structure, not just visuals. Figma Make brings this capability into a practical workflow, allowing anyone to generate clean, consistent results from real design files.
The key is simple: the clearer and more structured your design, the better the outcome. With the right design reference Like Shadcn Studio, and a bit of iteration, tools like Figma Make can help you move faster from idea to usable UI—without losing control or creative intent.
In the end, it’s not about letting AI build products for you, but about using it as a smarter partner in the product-building process.