
Modern web development often feels like choosing between two worlds:
-
Backend frameworks like Laravel
-
Frontend frameworks like React
But what if you could combine them cleanly — without building a full API layer or managing two separate applications?
That’s exactly what this guide will show you.
We’ll build a modern Laravel application using:
-
Laravel (backend logic)
-
Inertia.js (bridge between backend and frontend)
-
React (UI rendering)
-
Tailwind CSS v4
-
shadcn/ui (beautiful, customizable components)
If you’re a beginner, don’t worry. We’ll go step by step and explain what each piece does and why we need it.
By the end of this tutorial, you’ll have a working Laravel Shadcn + React setup.
What We’re Building
Before jumping into commands, let’s understand the architecture in simple terms. Normally, Laravel renders Blade templates on the server.
However, with Inertia.js, Laravel sends data to a React frontend without building a separate API. You still define routes in Laravel, but React handles rendering the UI.
shadcn/ui then gives us high-quality UI components built on Tailwind CSS.
So the flow looks like this:
- Laravel Route -> Inertia -> React Page -> Shadcn Component
This keeps everything inside one project while still giving us a modern frontend.
Prerequisites
Make sure you have:
-
PHP 8.1+
-
Composer
-
Node.js 18+
-
npm
-
Basic knowledge of Laravel and React
If you need Laravel installation instructions, refer to the official documentation.
Create a New Laravel Shadcn Project

Set up a fresh Laravel application and install initial dependencies to get started.
- Let’s begin with a fresh Laravel app:
composer create-project laravel/laravel laravel-shadcnui
cd shadcn-laravel- Install Node dependencies:
npm installAt this stage, we have a clean Laravel project with Vite support.
Install Inertia (Laravel Side)
Install Inertia on the Laravel side to enable server-driven React rendering.
- Now install Inertia on the backend:
composer require inertiajs/inertia-laravel- Generate the middleware:
php artisan inertia:middleware- This creates:
app/Http/Middleware/HandleInertiaRequests.php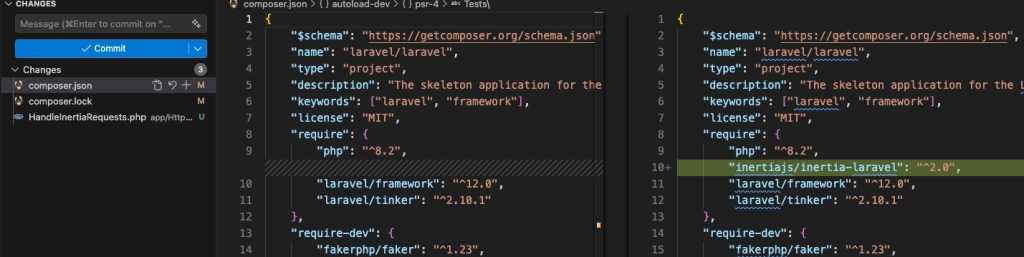
Important: Why php artisan install:react Fails
Understand why this command fails and what the correct setup approach is.
- You might try running:
php artisan install:reactYou’ll get an error because this command does not exist in Laravel.
- That’s why you see an error.

Laravel does not automatically install React. You must install React manually on the frontend side using npm.
In case you don’t want to start from scratch, you can use the ready-to-use libraries like Shadcn Studio
Special Mention: Shadcn Studio

Shadcn Studio goes beyond animations by providing animated blocks and sections built on top of Shadcn UI. It’s perfect for teams that want speed without compromising design quality.
Key Features:
-
Pre-animated components, blocks, and layouts
-
Built specifically for Shadcn UI
-
Consistent motion patterns
-
Great for marketing and landing pages
Furthermore, Animated variants with motion add smooth, modern animations to your components, enhancing user experiences with minimal effort.
Best For: Startups, agencies, and rapid MVP development.
Additionally, it comes with the following features:
-
Open-source: Dive into a growing, community-driven collection of copy-and-paste shadcn components, Shadcn blocks, and templates.
-
Component & Blocks variants: Access a diverse collection of customizable shadcn ui blocks and component variants to quickly build and style your UI with ease.
-
Landing pages & Dashboards: Explore 20+ premium & free Shadcn templates for dashboards, landing pages & more. Fully customizable & easy to use.
-
shadcn/ui for Figma: Speed up your workflow with Shadcn Figma Design System with components, blocks & templates – a full design library inspired by shadcn/ui.
-
Powerful theme generator: Customize your UI instantly with Shadcn Theme Generator. Preview changes in real time and create consistent, on-brand designs faster.
-
shadcn/studio MCP: Integrate shadcn MCP Server directly into your favorite IDE and craft stunning shadcn/ui Components, Blocks, and Pages inspired by shadcn/studio.
-
Shadcn Figma To Code Plugin: Convert your Figma designs into production-ready code instantly with the Shadcn Figma to Code Plugin.
-
Drag & Drop Builder: Build complete pages visually with drag and drop Shadcn Builder. Search and drag pre-built blocks (Hero, Features, Pricing, etc.) onto a canvas, rearrange them instantly, preview in real time, and export production-ready code or CLI install commands.
Register Inertia Middleware
Laravel 11+ changed its structure and removed Kernel.php. So middleware registration differs depending on your version.
Laravel 10 and Older
Use the traditional Kernel-based middleware registration.
- Edit:
app/Http/Kernel.php- Add below inside the web middleware group:
'web' => [
    ...
    \\App\\Http\\Middleware\\HandleInertiaRequests::class,
]
Laravel 11 / 12
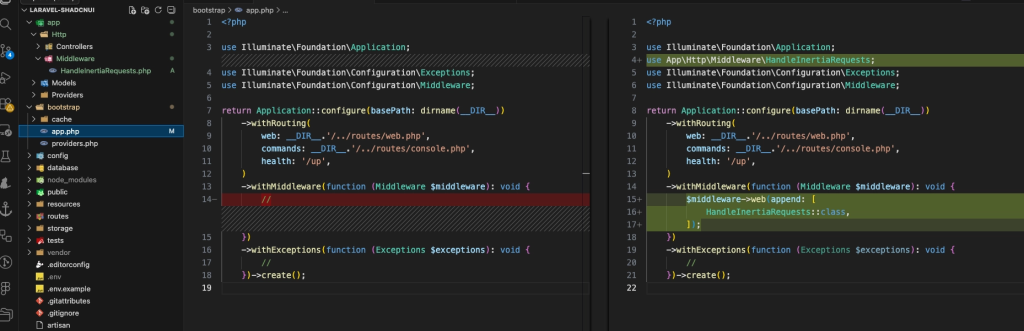
Use the new middleware configuration approach introduced in recent Laravel versions.
- Edit:
bootstrap/app.php- Find:
->withMiddleware(function (Middleware $middleware) {
    //
})- Update middleware section:
use App\\Http\\Middleware\\HandleInertiaRequests;
use Illuminate\\Foundation\\Configuration\\Middleware;

->withMiddleware(function (Middleware $middleware) {
    $middleware->web(append: [
        HandleInertiaRequests::class,
    ]);
})
Install React + Vite
npm install react react-dom
npm install @vitejs/plugin-react --save-dev
Install Tailwind CSS v4
- Install Tailwind v4 using the Vite plugin:
npm i tailwindcss @tailwindcss/viteTailwind v4 uses a Vite plugin approach instead of the old PostCSS method.
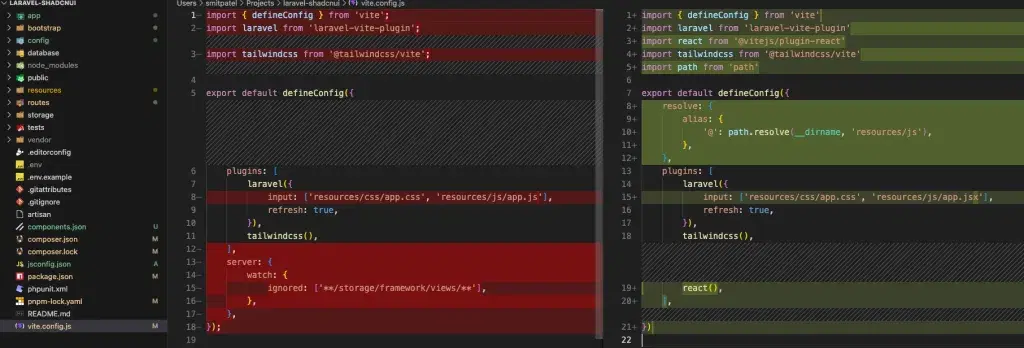
Update vite.config.js:
Configure Vite to work with Tailwind and React.
- Make sure it looks like this:
import { defineConfig } from 'vite'
import laravel from 'laravel-vite-plugin'
import react from '@vitejs/plugin-react'
import tailwindcss from '@tailwindcss/vite'
import path from 'path'

export default defineConfig({
  resolve: {
    alias: {
      '@': path.resolve(__dirname, 'resources/js'),
    },
  },
  plugins: [
    laravel({
      input: ['resources/css/app.css', 'resources/js/app.jsx'],
      refresh: true,
    }),
    tailwindcss(),
    react(),
  ],
})
Remove Old PostCSS Config (If Exists)
Clean up legacy configs to avoid conflicts with Tailwind v4. If you previously followed a Tailwind v3 tutorial and created:
-
postcss.config.js -
autoprefixer setup
Remove them unless you explicitly need PostCSS plugins.
In Tailwind v4, using the old PostCSS config often causes errors.
Install Inertia React (Frontend)
Install the React adapter for Inertia to connect frontend components with Laravel routes.
- Now install Inertia for React:
npm i @inertiajs/reactConfigure Inertia Root Setup
Set up the root HTML and Inertia configuration that bootstraps your app.
Configure Root Blade View
- Create:
resources/views/app.blade.php<!DOCTYPE html>
<html lang="en">
<head>
<meta charset="utf-8" />
<meta name="viewport" content="width=device-width, initial-scale=1" />
@vite(['resources/css/app.css', 'resources/js/app.jsx'])
@inertiaHead
</head>
<body>
@inertia
</body>
</html>Configure Inertia Root View
- Ensure Inertia knows which root template to use. If
config/inertia.phpdoes not exist, publish it:
php artisan vendor:publish --provider="Inertia\\ServiceProvider"Setup Routing
Define Laravel routes that render React pages via Inertia.
Configure Routes
- Open:
routes/web.php
use Inertia\\Inertia;

Route::get('/', function () {
    return Inertia::render('Home');
});
Create React Entry File
Initialize the main React entry file that loads pages dynamically.
resources/js/app.jsx
import '../css/app.css'
import { createInertiaApp } from '@inertiajs/react'
import { createRoot } from 'react-dom/client'

createInertiaApp({
  resolve: (name) => {
    const pages = import.meta.glob('./Pages/**/*.jsx', { eager: true })
    return pages[`./Pages/${name}.jsx`]
  },
  setup({ el, App, props }) {
    createRoot(el).render(<App {...props} />)
  },
})
Create First Page
Create your first React page to verify that everything is working correctly.
resources/js/Pages/Home.jsx
export default function Home() {
  return <div className="p-6">Hello Inertia + React</div>
}
Add shadcn/ui
Install and initialize shadcn/ui to start using modern UI components. Check the Official guide.
- Initialize:
npx shadcn@latest init- Add button:
npx shadcn@latest add button
Use the Component
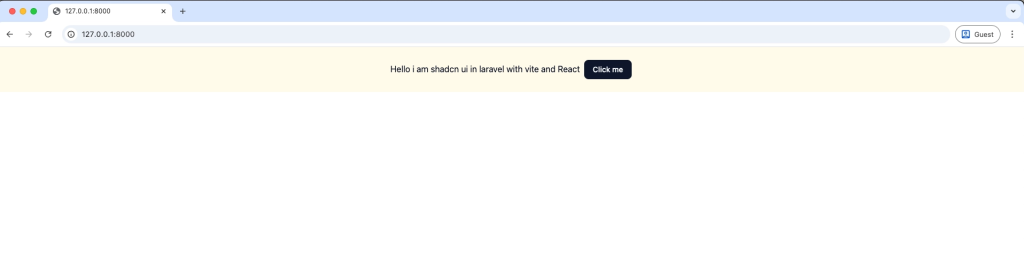
Import and use a shadcn component inside your React page.
- Update
Home.jsx:
import { Button } from "@/components/ui/button"

export default function Home() {
    return (
        <div className="p-6 text-center bg-amber-50">
            <span className="mr-2">Hello i am shadcn ui in laravel with vite and React</span>
            <Button>Click me</Button>
        </div>
    )
}- You are now officially using shadcn/ui inside Laravel.
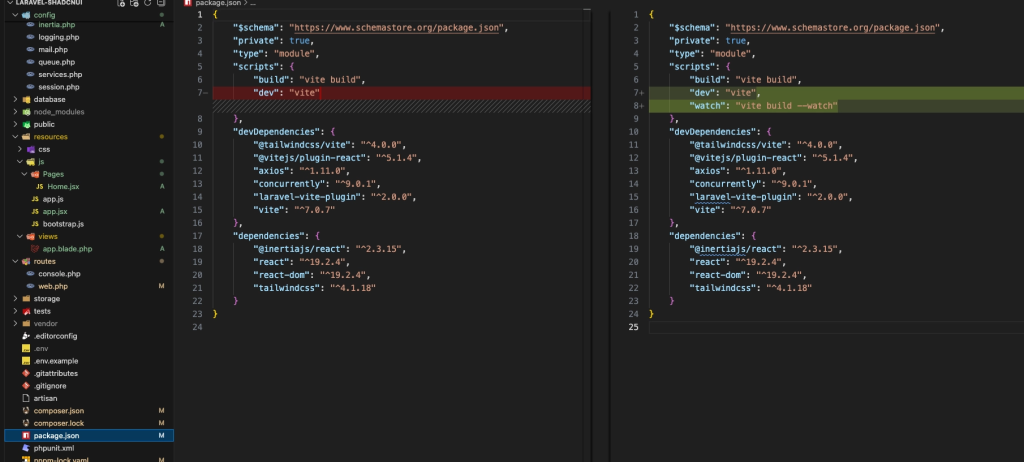
Add Watch Command (Optional but Helpful)
Enable automatic rebuilds during development for a smoother workflow.
- In
package.json:
"scripts": {
  "watch": "vite build --watch"
}- Run:
npm run watch- This allows you to see changes without rebuilding manually.
Run the Project
Start the development server and verify your setup in the browser.
- Install npm
npm install
npm run warch
php artisan serve- Visit:
<http://127.0.0.1:8000>You should see your shadcn Button rendered inside a Laravel app.
Clone the Final Source Code
Skip manual setup by using a pre-configured project.
- If you want to skip the manual setup and directly explore the completed project, you can clone the repository:
gitclone <https://github.com/smitbhalodiya/laravel-shadcnui.gitcd> laravel-shadcnui
composer install
npm install
npm run dev
php artisan serve
Check out the Repository link. This repository contains the complete working configuration described in this article.
Final Project Structure
Understand how files are organized in a production-ready setup.
resources/
 ├── js/
 │   ├── app.jsx
 │   ├── Pages/
 │   └── components/ui/
 ├── css/app.css
 └── views/app.blade.php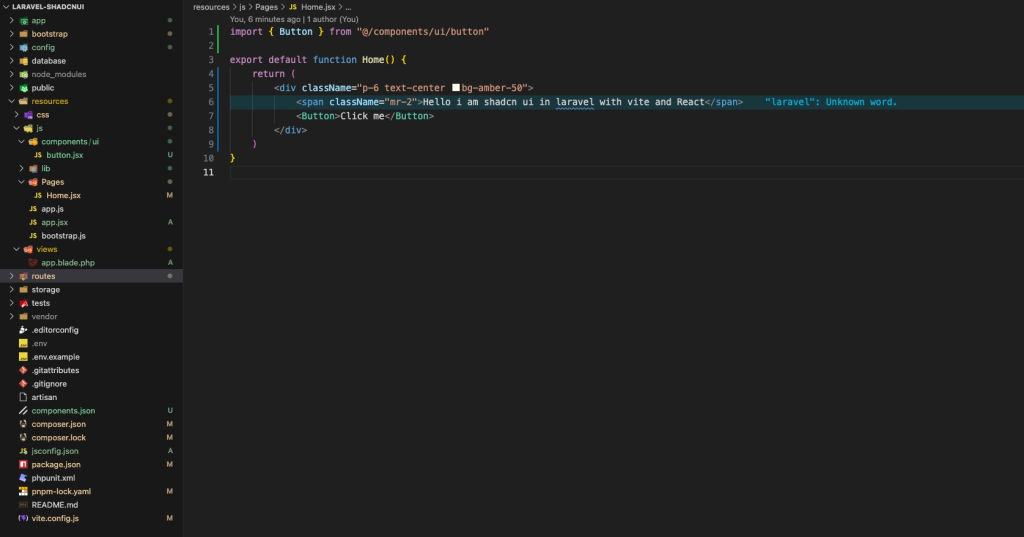
Conclusion:
Integrating shadcn/ui into Laravel becomes straightforward once you understand the roles:
-
Laravel handles backend logic
-
Inertia connects backend and frontend
-
React renders the interface
-
Tailwind styles everything
-
shadcn provides polished components
Instead of treating Laravel and React as separate worlds, Inertia lets them work together naturally.
This approach gives you:
-
Full backend control
-
Modern React UI
-
Clean, customizable components
-
No heavy UI dependencies
-
Excellent developer experience
From here, you can extend this setup with:
-
Authentication (Laravel Breeze + React)
-
Layout systems
-
Theming with shadcn
-
Full SaaS dashboards
You now have a production-ready foundation for modern Laravel applications.